I share my Cricut Design Space files with people who support me on Patreon, they also get great discounts on the digital paper along with Exclusive Digital Paper. If you want the file for this card you can get it here by supporting me for $1 along with hundreds of other files. https://www.patreon.com/posts/thank-you-pop-6672420
The leaves are all in this image - Leaves - #M3B92C from the cartridge Simply Scarecrow, if you don't own them or have Access you will be charged $.99 from Cricut, you are welcome to delete them and you will not be charged, The font I used in the file was free Cricut Alphabet and Cricut Font and Basic Shapes, the font for the writing I used in the video was called Haley, a Cricut Access Exclusive.
5) Place transparency sheet on top of foil and roll with brayer
6) Cut foil to size and wrap around photo mat or chipboard
7) Layer the transparency and foil pieces
Now that you have the background complete, it's up to you to create something for the front!
Finishing Notes
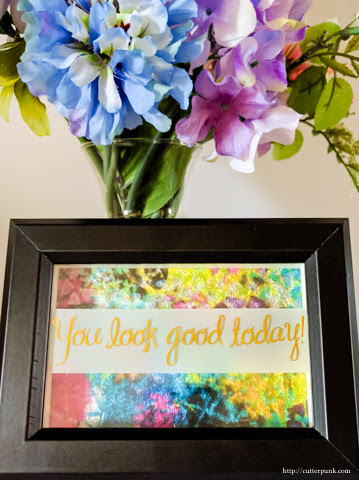
For my front, I chose to use some foiled text on an additional sheet of transparency, but found the text displayed best with a piece of vellum behind it.
In the video, you can see the difference between using a darker, monochromatic background like the Amy paper I show in the video versus a more rich and vividly colored image, like the Jenny digital paper set provides.
There is no need to glue the transparency to foil as the layers of the assembled frame will keep things in place. This makes it easy to swap designs if you want to freshen up a look!
The effect is best achieved when the foil is tightly pressed against the transparency, which the rear panel of the frame does quite well on its own. Try using additional pieces of cardstock or chipboard to shim things more tightly, if necessary.
I tried using some glossy Mod Podge to bond the transparency to the foil and it decreased the reflective bling of this technique, so I don't recommend it.
Share With Us
If you create a variation of this project, please share a link to a photo in the comments below. The MLD Design Team and other readers love to see your creations, too!
Not sure about this whole digital paper thing? Click here to download some of Melody Lane's digital paper for free and try it out for yourself!